Does Bosh Upload-blobs Upload to the Dav Also?
Creating a Release
A release contains i or more pieces of software that work together. For instance, you could create a release of a service with three pieces: two MySQL nodes and a dashboard app.
There are four fundamental elements in a release:
- Jobs draw pieces of the service or application yous are releasing
- Packages provide source code and dependencies to jobs
- Source provides non-binary files to packages
- Blobs provide binary files (other than those checked into a source lawmaking repository) to packages
The following instructions use an example release that includes two jobs: a spider web UI and a background worker. The two jobs divide the functionality provided by single Ruby app, ardo_app (you lot can use simple gist as app).
Preparation
This section needs to be completed once. Next, you iterate through Steps 1 through 6 until your dev release is satisfactory. And so you can do a final release.
Create the release directory
To create the release directory, navigate into the workspace where you desire the release to be, and run:
bosh init-release --dir <release_name>
Yous can add the --git option to initialize a git repository. Utilise dashes in the release name. Use underscores for all other filenames in the release.
View the release with tree:
Should outcome in:
. ├── config │ ├── blobs.yml │ └── terminal.yml ├── jobs ├── packages └── src 4 directories, 2 files
When deploying your release, BOSH places compiled code and other resource in the /var/vcap/ directory tree, which BOSH creates on the chore VMs. The four directories you just created, jobs, packages, src, and blobs, appear on job VMs every bit /var/vcap/jobs, /var/vcap/packages, /var/vcap/src, and /var/vcap/blobs, respectively.
Populate the src directory
Copy your source code into the src directory. Alternatively, link your source code to the directory using a mechanism such as a Git submodule or a Mercurial repo.
In our example, nosotros create a binder named ardo_app and put our source code there.
View the release with tree:
$ tree . . ├── config │ ├── blobs.yml │ └── terminal.yml ├── jobs ├── packages └── src └── ardo_app ├── Gemfile ├── Gemfile.lock ├── app.rb └── config.ru 5 directories, half-dozen files
Choose a work strategy
Cull whether you want to piece of work 1 step at a time or one job at a time. For releases with just a few jobs, going one step at a time is probably easiest. If you have a larger number of jobs, going one chore at a time may be more than efficient.
Step one: Create Job Skeletons
Navigate into the release directory.
For each job, create a task skeleton:
bosh generate-job <job_name>
In our case, we run bosh generate-job twice, once for the web_ui job, and one time for the bg_worker task.
View the job skeletons with tree:
Should upshot in:
. ├── config │ ├── blobs.yml │ └── final.yml ├── jobs │ ├── bg_worker │ │ ├── monit │ │ ├── spec │ │ └── templates │ └── web_ui │ ├── monit │ ├── spec │ └── templates ├── packages └── src └── ardo ├── Gemfile ├── Gemfile.lock ├── app.rb └── config.ru ix directories, x files
Create control scripts
Every job needs a manner to start and stop. Yous provide that by writing a control script and updating the monit file.
The control script:
- Includes a start command and a stop command.
- Is an ERB template stored in the
templatesdirectory for the relevant job.
For each job, create a control script that configures the job to shop logs in /var/vcap/sys/log/JOB_NAME. Save this script as ctl.erb in the templates directory for its job.
The control script for the web_ui task looks like this:
#!/bin/bash RUN_DIR =/var/vcap/sys/run/web_ui LOG_DIR =/var/vcap/sys/log/web_ui PIDFILE = ${ RUN_DIR }/pid case $1 in start) mkdir -p $RUN_DIR $LOG_DIR chown -R vcap:vcap $RUN_DIR $LOG_DIR repeat $$ > $PIDFILE cd /var/vcap/packages/ardo_app export PATH =/var/vcap/packages/ruby_1.ix.3/bin:$PATH exec /var/vcap/packages/ruby_1.9.iii/bin/bundle exec \ rackup -p <%= p( 'port' ) %> \ >> $LOG_DIR/web_ui.stdout.log \ two>> $LOG_DIR/web_ui.stderr.log ;; finish) kill -9 `cat $PIDFILE ` rm -f $PIDFILE ;; *) echo "Usage: ctl {start|stop}" ;; esac
If your release needs templates other than the control script, create them now.
For example if the task can be used to deploy clusters of nodes, especially in the case of stateful clusters (east.thou. a database or distributed data shop), you volition want to write a drain script for your job to ensure that the service is not afflicted by the rolling provisioning/update operations performed by BOSH.
Update monit files
The monit file:
- Specifies the process ID (pid) file for the job
- References each command provided by the templates for the task
- Specifies that the job belongs to the
vcapgroup
On a deployed release, a BOSH Agent runs on each job VM. BOSH communicates with the Amanuensis, which in turn executes commands in the control script. The Amanuensis does this using open source procedure monitoring software called Monit.
The monit file for the web_ui job looks like this:
check procedure web_ui with pidfile /var/vcap/sys/run/web_ui/pid starting time plan "/var/vcap/jobs/web_ui/bin/ctl offset" terminate programme "/var/vcap/jobs/web_ui/bin/ctl cease" group vcap
Update the monit file for each of your jobs. Use /var/vcap paths equally shown in the instance.
Note
BOSH requires a monit file for each job in a release. When developing a release, you tin utilise an empty monit file to meet this requirement without having to first create a control script.
Update chore specs
At compile time, BOSH transforms templates into files, which it then replicates on the chore VMs.
The template names and file paths are among the metadata for each job that resides in the job spec file.
In the task spec file, the templates block contains cardinal/value pairs where:
- Each key is template proper noun
- Each value is the path to the corresponding file on a job VM
The file paths that you provide for templates are relative to the /var/vcap/jobs/<job_name> directory on the VM. For example, bin/ctl becomes /var/vcap/jobs/<job_name>/bin/ctl on the job VM. Using bin as the directory where these files become is a convention.
The templates block of the updated spec files for the example jobs look similar this:
templates : ctl.erb : bin/ctl
For each job, update the spec file with template names.
Commit
Yous have now created one or more chore skeletons; this is a skillful time to commit.
If you used the --git option with bosh init-release (as recommended), the correct .gitignore file has been automatically created for yous.
Step ii: Make Dependency Graphs
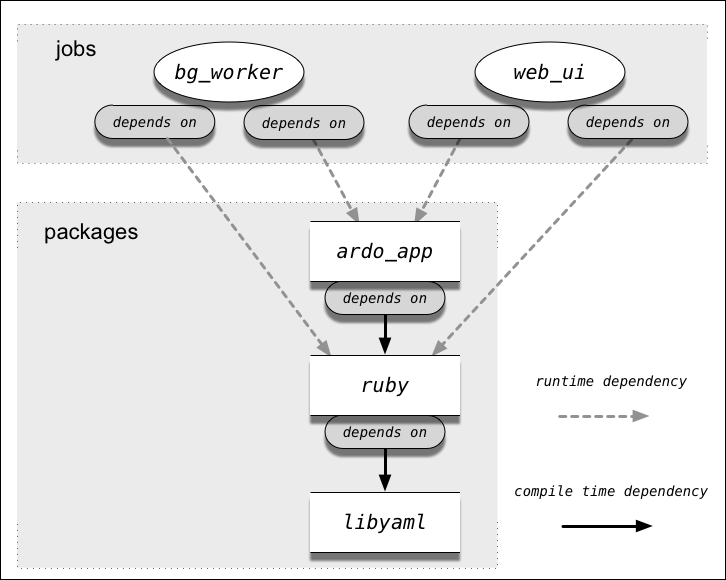
There are 2 kinds of dependencies in a BOSH release:
- The runtime dependency, where a job depends on a package at runtime. For example, the
web_uijob depends on Ruby. - The compile-time dependency, where a package depends on another package at compile fourth dimension. For example, Carmine depends on the YAML library.
Three rules govern these dependencies:
- Jobs never depend on other jobs.
- Jobs tin can depend on packages.
- Packages tin depend on other packages.
Building the Dependency Graph
Create a dependency graph to analyze your understanding of the dependencies between the jobs and packages in your release.
Place runtime dependencies
Whenever a control script or other template cites a package name, the job that the template belongs to depends on the cited parcel at runtime.
For each job, observe all the cases where your control scripts cite packages. Add together these runtime dependencies to your dependency graph.
In our instance, this line in both of our ctl.erb scripts cites ardo_app:
cd /var/vcap/packages/ardo_app
This line cites Ruby:
exec /var/vcap/packages/ruby_1.9.3/bin/bundle exec
This ways that both the web-ui and bg_worker jobs have runtime dependencies on both the ardo_app and ruby_1.9.iii packages.
Nosotros add these four runtime dependencies to our example dependency graph.
Place compile-time dependencies
Use your knowledge near the runtime dependencies yous have already noted. Consider the packages you take identified as dependencies. Practise any of them depend on other packages in turn?
Whenever a package depends on some other packet, that is a compile-fourth dimension dependency.
For each job, add the compile-time dependencies to your dependency graph. If you miss a dependency, BOSH lets you know later, when you lot attempt to deploy.
In our example, we already noted a runtime dependency on Ruby 1.nine.3. We now ask ourselves whether Ruby 1.9.3 itself has any dependencies. The answer is yes, it depends on libyaml 0.1.4.
Nosotros add this compile-time dependency to our case dependency graph.
The complete example dependency graph
The consummate dependency graph for ardo-release looks like this:
For a big or complicated release, consider making more one dependency graph.
Footstep three: Create Package Skeletons
Packages give BOSH the data needed to set up the binaries and dependencies for your jobs.
Create package skeletons starting from the bottom of your dependency graph.
bosh generate-bundle <dependency_name>
In our example, nosotros run this control 3 times. Starting from the bottom of the dependency graph, we run it for libyaml_0.1.four, ruby_1.9.iii, and ardo_app.
View the package skeletons with tree:
Should result in:
packages ├── ardo_app │ ├── packaging │ ├── pre_packaging │ └── spec ├── libyaml_0.ane.4 │ ├── packaging │ ├── pre_packaging │ └── spec └── ruby_1.9.3 ├── packaging ├── pre_packaging └── spec 3 directories, ix files
Putting each dependency in a separate package provides maximum reusability forth with a clear, modular construction. This is not mandatory; what packages to create is a matter of preference. You could fifty-fifty opt to put all the dependencies together in a unmarried packet, though that is not recommended.
Note
Use of the pre_packaging file is non recommended, and is not discussed in this tutorial.
Without using pre_packaging for our ardo_app we demand to pack gems manually for further usage:
cd src/ardo_app/ parcel package Update packaging specs
Within each package directory, there is a spec file which states:
- The package name
- The parcel'southward dependencies
- The location where BOSH tin can find the binaries and other files that the bundle needs at compile time
Use your dependency graph to determine which dependencies belong in each spec. Developer preferences and style play a role here. Consider our instance: the spec for Ruby lists rubygems and bundler as dependencies along with Ruby itself. Some Ruby developers would do it this way; others would non.
To maximize portability of your release across dissimilar versions of stemcells, never depend on the presence of libraries or other software on stemcells.
To draw binary locations in the files block of the spec:
-
Detect the official site for the binary in question. For example, Ruby might be at
http://cache.ruby-lang.org/pub/ruby/1.9/scarlet-1.9.3-p484.tar.gz. -
Download the binary from the official location and make sure the file hash matches.
-
Tape the binary proper name including version number, with a slash and the binary filename concatenated to it. It's a skillful thought to cite the official URL in a comment, in the same line.
BOSH interprets the locations y'all tape in the files section as being either in the src directory or in the blobs directory. (BOSH looks in src first.) When you lot add together the actual blobs to a blobstore (run into the next section), BOSH populates the blobs directory with the correct information.
For packages that depend on their own source code, use the globbing pattern <package_name>/**/* to deep-traverse the directory in src where the source code should reside.
Update the spec for each package. Refer to the instance specs below for guidance.
Instance libyaml bundle spec
--- name : libyaml_0.1.iv dependencies : [] files : - libyaml_0.1.four/yaml-0.1.4.tar.gz # From http://pyyaml.org/download/libyaml/yaml-0.1.four.tar.gz
Case Ruby package spec
--- name : ruby_1.9.3 dependencies : - libyaml_0.1.iv files : - ruby_1.ix.3/ruby-1.9.three-p484.tar.gz # http://cache.ruby-lang.org/pub/ruby/1.9/ruby-1.ix.3-p484.tar.gz - ruby_1.ix.3/rubygems-1.viii.24.tgz # http://product.cf.rubygems.org/rubygems/rubygems-1.8.24.tgz - ruby_1.9.three/bundler-one.2.ane.precious stone # https://rubygems.org/downloads/bundler-i.2.one.gem
Instance ardo_app package spec
--- proper name : ardo_app dependencies : - ruby_1.9.3 files : - ardo_app/**/*
Create packaging scripts
At compile time, BOSH takes the source files referenced in the package specs, and renders them into the executable binaries and scripts that your deployed jobs need.
You write packaging scripts to instruct BOSH how to do this. The instructions may involve some combination of copying, compilation, and related procedures. For example:
-
For a Crimson app like
ardo_app, BOSH must copy source files and install Ruby gems. -
For Ruby itself, BOSH must compile source code into a binary.
-
For a Python app, BOSH must copy source files and install Python eggs.
BOSH relies on you to write packaging scripts that perform the correct performance.
Adhere to these principles when writing packaging scripts:
-
Use your dependency graph to determine which dependencies belong in each packaging script.
-
Brainstorm each script with a
prepare -e -xline. This aids debugging at compile time by causing the script to leave immediately if a control exits with a not-zippo exit code. -
Ensure that whatsoever copying, installing or compiling delivers resulting code to the install target directory (represented as the
BOSH_INSTALL_TARGETsurroundings variable). Formakecommands, useconfigureor its equivalent to reach this. -
Be aware that BOSH ensures that dependencies cited in the
dependenciesblock of parcelspecfiles are available to the deployed binary. For example, in thespecfile for the Ruby package, we cite libyaml as a dependency. This ensures that on the compilation VMs, the packaging script for Ruby has access to the compiled libyaml package.
If the instructions you lot provide in the packaging scripts fail to deliver compiled lawmaking to BOSH_INSTALL_TARGET, the job cannot office considering the VM has no manner to observe the lawmaking to run. This failure scenario tin can happen if, for case, you use a make command that delivers compiled code to some standard location by default. You tin fix the trouble past configuring make to compile into BOSH_INSTALL_TARGET. See how this is done in the case packaging scripts.
Like control scripts, writing packaging scripts is one of the heavier tasks entailed in creating a release. Write your packaging scripts at present. Refer to the examples below for guidance.
Example libyaml packaging script
fix -e -x tar xzf libyaml_0.i.4/yaml-0.1.4.tar.gz pushd yaml-0.1.iv ./configure --prefix=${ BOSH_INSTALL_TARGET } make make install popd
Example Ruby packaging script
fix -eastward -x tar xzf ruby_1.ix.3/carmine-1.ix.iii-p484.tar.gz pushd ruby-1.ix.three-p484 ./configure \ --prefix=${ BOSH_INSTALL_TARGET } \ --disable-install-physician \ --with-opt-dir=/var/vcap/packages/libyaml_0.1.4 make make install popd tar zxvf ruby_1.9.3/rubygems-1.eight.24.tgz pushd rubygems-1.eight.24 ${ BOSH_INSTALL_TARGET }/bin/ruby setup.rb popd ${ BOSH_INSTALL_TARGET }/bin/gem install ruby_1.9.iii/bundler-1.2.1.precious stone --no-ri --no-rdoc
Case ardo_app packaging script
prepare -eastward -x cp -a ardo_app/* ${ BOSH_INSTALL_TARGET } cd ${ BOSH_INSTALL_TARGET } /var/vcap/packages/ruby_1.ix.3/bin/parcel install \ --local \ --deployment \ --without development test
Update job specs with dependencies
The dependency graph reveals runtime dependencies that demand to be added to the packages block of the task spec.
Edit the task specs to include these dependencies.
In our case, the dependency graph shows that web_ui job depends on ardo_app and ruby_1.9.3:
packages : - ardo_app - ruby_1.ix.3
Step 4: Add together Blobs
When creating a release, you will likely apply a source code repository. Simply releases often employ tar files or other binaries, also known equally blobs. Checking blobs into a repository is problematic if your repository unsuited to dealing with large binaries (as is truthful of Git, for example).
BOSH lets you avert checking blobs into a repository past doing the following:
-
For dev releases, apply local copies of blobs.
-
For a final release, upload blobs to a blobstore, and direct BOSH to obtain the blobs from at that place.
Configure a blobstore
In the config directory, you record the information BOSH needs about the blobstore:
-
The
final.ymlfile names the blobstore and declares its type, which is eitherlocalor i of several other types that specify blobstore providers. -
The
private.ymlfile specifies the blobstore path, along with a hugger-mugger.
individual.yml contains keys for accessing the blobstore and should not exist checked into a repository. (If you used the --git pick when running bosh init-release at the beginning of this tutorial, private.yml is automatically gitignored.)
The config directory too contains 2 files whose content is automatically generated: the blobs.yml file and the dev.yml file.
Conform the examples below to fit the specifics of your release. Our case release uses the local type blobstore because otherwise it would exist necessary to explicate how to configure a public blobstore such as Amazon S3, which is as well large a topic for this context. More information on full blobstore configuration tin can be found here.
The local type blobstore is suitable for learning but the resulting release cannot be shared. For that reason, y'all should configure a non-local, publicly bachelor blobstore for releases that you lot intend to share. Normally, the blobstore you lot choose when you begin working on a release is used for all subsequent versions of the release. Irresolute the blobstore that a release uses is beyond the telescopic of this tutorial.
Example concluding.yml:
--- proper name : ardo_app blobstore : provider : local options : blobstore_path : /tmp/ardo-blobs
Example private.yml:
--- blobstore_secret : 'does-not-matter' blobstore : local : blobstore_path : /tmp/ardo-blobs
If you have a private.yml file:
- Required: Include the
blobstore_pathin theprivate.ymlfile. - Optional: Include the
blobstore_pathin theconcluding.ymlfile. Doing so allows you togitignoretheindividual.ymlfile but still allow the release to be downloaded and used on other systems.
Notation
The blobstore_secret is required for the local blazon blobstore. This is true even though the blobstore_secret line is deprecated and its content does not matter. There is never a blobstore_secret line for blobstores of types other than local.
Inform BOSH where blobs are
In the packet spec file, the files cake lists whatsoever binaries you downloaded, forth with the URLs from which yous downloaded them. (This assumes that you followed the directions in the Update package specs section.)
Those files are blobs, and at present yous need the paths to the downloaded blobs on your local system.
In our example, the spec file for the libyaml_0.i.4 package includes the line:
files : - libyaml_0.ane.4/yaml-0.1.4.tar.gz # From http://pyyaml.org/download/libyaml/yaml-0.1.four.tar.gz
If you lot downloaded the hulk, its local path might exist:
~/Downloads/yaml-0.ane.4.tar.gz
Go through all your packages and brand a list of local paths to the blobs you downloaded. Now you are ready to inform BOSH about these blobs.
For each blob, run:
bosh add-hulk <path_to_blob_on_local_system> <path_as_specified_in_spec_files>
e.k.
bosh add-blob ~/Downloads/yaml-0.1.4.tar.gz libyaml_0.1.4/yaml-0.1.4.tar.gz
The bosh add-blob command adds a local hulk to the collection your release recognizes as BOSH blobs.
The usage shown to a higher place works like this:
- For the outset argument, you provide the path to the hulk on your local system
- For the second argument, yous provide a destination within the
blobsdirectory in your release
Using the package name equally the prefix for the second argument of the bosh add together-blob control is recommended because it produces a cleanly-organized blobs directory.
After, when you upload blobs for a final release, BOSH uses the hidden directory every bit a staging expanse.
View the release with tree:
$ tree . . ├── blobs │ ├── libyaml_0.1.iv │ │ └── yaml-0.1.four.tar.gz │ └── ruby_1.9.3 │ ├── bundler-1.2.1.gem │ ├── cherry-1.9.3-p484.tar.gz │ └── rubygems-1.8.24.tgz ├── config │ ├── blobs.yml │ └── terminal.yml ├── jobs │ ├── bg_worker │ │ ├── monit │ │ ├── spec │ │ └── templates │ │ └── ctl.erb │ └── web_ui │ ├── monit │ ├── spec │ └── templates │ └── ctl.erb ├── packages │ ├── ardo_app │ │ ├── packaging │ │ └── spec │ ├── libyaml_0.1.4 │ │ ├── packaging │ │ └── spec │ └── ruby_1.9.iii │ ├── packaging │ └── spec └── src └── ardo_app ├── Gemfile ├── Gemfile.lock ├── app.rb ├── config.ru └── vendor └── enshroud ├── rack-ane.five.ane.jewel ├── rack-protection-1.3.two.jewel ├── sinatra-1.3.4.gem └── tilt-i.3.3.jewel 17 directories, 26 files
Do not upload blobs for a dev release
One time you have uploaded blobs to a not-local blobstore, those blobs may become essential to another developer. For this reason, uploading a blob and and then removing it is considered poor practice.
When creating dev releases, practice not run bosh upload-blobs. (You lot but run it when you exercise a final release.)
Step 5: Create Job Properties
If your service needs to be configurable at deployment time, you create the desired inputs or controls and specify them in the release. Each input is a property that belongs to a detail job.
Creating properties requires iii steps:
-
Define properties and defaults in the
propertiesblock of the job spec. -
Use the property lookup helper
p()to reference properties in relevant templates.
For case, a start command can take a holding as an argument, using the property lookup helper:
<%= p ( '<property_name>' ) %>
- Specify the property in the deployment manifest.
Adapt the case beneath to create whatever properties your release needs now.
In our example, we want the port that the web UI listens on to be a configurable property.
Nosotros edit the spec for the web UI job to look like this:
properties : port : description : Port that web_ui app listens on default : 80
Step 6: Create a Dev Release
All the elements needed to create a dev release should at present be in identify.
Release
For the dev release, use the --force selection with the bosh create-release command. This forces BOSH to use the local copies of our blobs.
Without the --force option, BOSH requires blobs to exist uploaded before yous run bosh create-release. For a final release, nosotros upload blobs, but not for a dev release.
Create the dev release:
bosh create-release --force
BOSH prompts for a release name, and assigns a dot-number version to the release.
Deploy the Dev Release
Deploying the release requires 3 or more steps, depending on whether BOSH is targeting the desired Director, and whether BOSH is already pointing to a release.
Meet what director BOSH is targeting:
bosh env
Target a director:
bosh -east <director_alias> log-in
Encounter what releases are available:
bosh releases
If BOSH is already pointing to a release, edit the BOSH deployment manifest. Otherwise, create a manifest. Encounter BOSH Deployment Manifest for more information. Simple manifest for ardo_app can be found hither.
Upload the new dev release.
bosh upload-release
Assuming you are in the release directory, no path is needed with the above control.
Deploy:
bosh -d bosh-tutorial-deployment deploy <path-to-manifest.yml>
Note
Once deployment finishes successfully, near likely yous will non exist able to access the red app you just deployed through the browser. It is because there is no firewall rule fastened to the vms. You can attach a firewall rule to the vms, or only bosh ssh into the vms and run curl localhost:<port>
Examination the Dev Release
What tests to run depends on the software yous are releasing.
Start by opening a separate terminal, logging in on the job VM, and observing logging output as y'all test your release.
If your release fails tests, follow this pattern.
- Fix the lawmaking.
- Practise a new dev release.
- Run
bosh deployto run into whether the new release deploys successfully.
Using bosh deploy --recreate can provide a clearer picture considering with that option, BOSH deploys all the VMs from scratch.
Create a Final Release
Only proceed to this step if your latest dev release passes all tests.
Upload blobs
When you use the bosh create-release --force control to create them, dev releases depend on locally-stored blobs. To practise a final release, you must upload blobs starting time.
If files that you need to proceed individual are uploaded to a public blobstore, there is no satisfactory way to disengage the mistake. To avert this situation, complete the following steps immediately earlier you upload blobs:
-
Run
bosh blobsto see the list of blobs BOSH is prepared to upload -
Proofread the list of blobs displayed by the command
-
The list should include just the blobs you need for the final release
-
If the list includes any files that should non be uploaded, observe and delete the symbolic links to them in the
blobsdirectory
To upload your blobs, run:
bosh upload-blobs
Commit
The bosh upload-blobs control has now populated the blobs.yml file in the config directory with metadata for uploaded blobs.
This is a good reason to commit.
Release
Run:
bosh create-release --terminal
BOSH prompts you for a release proper noun, and assigns a whole-number version to the release.
This is a practiced time to button your code to a shared repository to requite others admission to your final release.
Commit
Exercise i more than commit before you deploy!
Deploy the Final Release
Run:
bosh deploy
Source: https://bosh.io/docs/create-release/
0 Response to "Does Bosh Upload-blobs Upload to the Dav Also?"
Enregistrer un commentaire